投稿日:2022-12-03
【Three.js-IFC.js】React Three Fiberを使用してifcデータを読み込む
#Three.js
#IFC
#R3F
#Basic
ifc.jsが数年前に大幅な改装をしたようなので新しい記事を書きました。↓↓
今回は React Three Fiber と IFC.js を使って IFC データをブラウザで表示していきます。また IFC.js の公式ドキュメントにあるチュートリアルも少し実装してみたいと思います。公式ドキュメント
で Vanilla.js で実装しているものを React に置き換えてみたといった内容になってます。私自身、普段 IFC データを触っているわけではないので、おかしな箇所あったら教えていただけると幸いです。sample の IFC データは公式ドキュメントが提供してくれているものを使用しております
ソースコードは
にあげてますのでご興味あれば。
Version 一覧
- React : 18.2.0
- Typescript : 4.9.3
- three.js: 0.146.0
- React-three-fiber : 8.9.1
- react-three-drei : 9.45.0
- web-ifc-three : 0.0.121
- zustand : 4.1.4
- gsap : 3.11.3
- chakra-ui : 2.4.2
React app の立ち上げ
まずは、React の新規アプリケーションを立ち上げます。今回は Typescript も使用していこうと思います。 ターミナルで以下を実行します。
1npx create-react-app ifc-viewer --template typescript
作成したアプリのディレクトリに移動してローカルサーバーを立ち上げます。
にアクセスし、以下の画面が立ち上がれば OK です。
1cd ifc-viewer
2npm run start dev

不要なファイルを削除します。public ディレクトリと src ディレクトリの中身を以下を残して全て削除します。

index.tsx / App.tsx / index.html の中身を以下のように修正し、表示画面も以下のようになっていれば OK です。
1import React from "react";
2import ReactDOM from "react-dom/client";
3import "./index.css";
4import App from "./App";
5
6const root = ReactDOM.createRoot(
7  document.getElementById("root") as HTMLElement
8);
9root.render(
10  <React.StrictMode>
11    <App />
12  </React.StrictMode>
13);
1import "./App.css";
2
3function App() {
4  return <h1>Hello world</h1>;
5}
6
7export default App;
1<!DOCTYPE html>
2<html lang="en">
3  <head>
4    <meta charset="utf-8" />
5    <link rel="icon" href="%PUBLIC_URL%/favicon.ico" />
6    <meta name="viewport" content="width=device-width, initial-scale=1" />
7    <meta name="theme-color" content="#000000" />
8    <meta
9      name="description"
10      content="Web site created using create-react-app"
11    />
12    <title>IFC App</title>
13  </head>
14  <body>
15    <noscript>You need to enable JavaScript to run this app.</noscript>
16    <div id="root"></div>
17  </body>
18</html>

続いて Three.js / React three fiber など諸々のライブラリをインストールしていきます。バージョンを指定しながらインストールしてますが、最新版が良い方は@0.146 などの@以降の記載不要です。ただバージョンによる違いがあるかもしれないのでご注意ください。
1npm install three@0.146.0 @react-three/fiber@8.9.1 @types/three@0.146.0 @react-three/drei@9.45.0
とりあえず React three fiber で球体と表示し OrbitControls で動かしてみましょう。App.tsx を以下のように書き換えて、画面に表示された球体が動かせれば OK です。
1import { Canvas } from "@react-three/fiber";
2import { OrbitControls } from "@react-three/drei";
3
4import "./App.css";
5
6function App() {
7  return (
8    <Canvas
9      style={{
10        width: "100vw",
11        height: "100vh",
12        background: "#f0f8ff",
13      }}
14      camera={{
15        fov: 75,
16        near: 0.1,
17        far: 200,
18        position: [10, 4, 10],
19      }}
20    >
21      <OrbitControls makeDefault />
22      <mesh>
23        <sphereGeometry />
24        <meshNormalMaterial wireframe />
25      </mesh>
26    </Canvas>
27  );
28}
29
30export default App;

立ち上げはこれで完了です。
IFC モデルを表示
それでは IFC モデルを表示していきます。とりあえず web-ifc-three をインストールします。
1npm install web-ifc-three@0.0.121
もしかしたらエラーが出てきます。web-ifc-three@0.0.121 が、threejs@0.146にまだ対応してないので threejs のバージョンを落とすか、--force オプションで半強制的にインストールするように指示があるかと思います。react drei との依存関係の兼ね合いもあり、今回は強制的にインストールしていきます。(※本来はしっかりバージョンを合わせるべきかと思いますが・・・)
1npm install web-ifc-three@0.0.121 --force
node_modules / web-ifc の中に[ web-ifc-mt.wasm ],[ web-ifc.wasm ] という2つのファイルがあるかと思います。この 2 つのファイルを public 直下にコピーしていきます。

ifc データを読み込む準備をしていきます。src ディレクトリに components ディレクトリを作成し、その中に Experience.tsx を作成、App.tsx に記載した OrbitContorols をこちらに記載します。また、ambientLight も設置しておきます。
その後、App.tsx で Experience.tsx を読み込みます。同じように球体が表示されていれば OK です。
1import { OrbitControls } from "@react-three/drei";
2
3const Experience = () => {
4  return (
5    <>
6      <ambientLight intensity={0.5} />
7      <OrbitControls makeDefault />;
8    </>
9  );
10};
11
12export default Experience;
1import { Canvas } from "@react-three/fiber";
2
3import "./App.css";
4import Experience from "./components/Experience";
5
6function App() {
7  return (
8    <Canvas
9      style={{
10        width: "100vw",
11        height: "100vh",
12        background: "#f0f8ff",
13      }}
14      camera={{
15        fov: 75,
16        near: 0.1,
17        far: 200,
18        position: [10, 4, 10],
19      }}
20    >
21      <Experience />
22      <mesh>
23        <sphereGeometry />
24        <meshNormalMaterial wireframe />
25      </mesh>
26    </Canvas>
27  );
28}
29
30export default App;
sample の ifc データを
からダウンロードし、public ディレクトリの直下におきます。file 名はなんでもいいですが、私は'sample-model.ifc'としてます

こちらのファイルを読み込んでいきます。Experience.tsx を以下のように書き換えます。また App.tsx に記載の球体は削除します。
1import { useThree } from "@react-three/fiber";
2import { OrbitControls } from "@react-three/drei";
3import { IFCLoader } from "web-ifc-three/IFCLoader";
4import {
5  acceleratedRaycast,
6  computeBoundsTree,
7  disposeBoundsTree,
8} from "three-mesh-bvh";
9
10const Experience = () => {
11  const { scene } = useThree();
12
13  const ifcLoader = new IFCLoader();
14
15  ifcLoader.ifcManager.setupThreeMeshBVH(
16    computeBoundsTree,
17    disposeBoundsTree,
18    acceleratedRaycast
19  );
20  ifcLoader.ifcManager.setWasmPath("../../");
21
22  ifcLoader.load("/sample-model.ifc", (ifcModel) => {
23    scene.add(ifcModel);
24  });
25  console.log(scene);
26
27  return (
28    <>
29      <ambientLight intensity={0.5} />
30      <OrbitControls makeDefault />;
31    </>
32  );
33};
34
35export default Experience;
- 11 行目 useThree から Scene を取り出してきます。
- 13 行目 その後 ifcLoader のインスタンスを作成。
- 15 行目 ifcLoader.ifcManager.setupThreeMeshBVH …はオブジェクトのピッキングが早くなるようです…正直よく分かってませんがいい感じのライブラリみたいです。こちら参照
- 20 行目 その後、wasm ファイルを読み込んでます。ここの相対パス若干ハマりましたが…
- 22 行目 sample データを読み込んで、scene に追加指定ます。
- 25 行目は、一旦 scene の中身を確認しています。
これで以下のように表示されれば OK ですが、これでは問題があります。developper tool で scene の中を確認すると、IFC Model が沢山格納されてしまってます。
これは Experience.tsx が更新されるたびに Load してしまっていることが原因です。
useEffect で処理を囲ってあげてもいいのですが、Twitter で R3F ではこうやるんだよと教えていただきました!

components ディレクトリ直下に Model.tsx を作成します。こちらでモデルをロードして primitive を返してあげます。また、ifcModel に ifc という名前をつけときます。

1import { useLoader } from "@react-three/fiber";
2import { IFCLoader } from "web-ifc-three";
3import { IFCModel } from "web-ifc-three/IFC/components/IFCModel";
4import {
5  acceleratedRaycast,
6  computeBoundsTree,
7  disposeBoundsTree,
8} from "three-mesh-bvh";
9
10const Model = () => {
11  const model: IFCModel = useLoader(
12    IFCLoader,
13    "/sample-model.ifc",
14    (loader) => {
15      loader.ifcManager.setupThreeMeshBVH(
16        computeBoundsTree,
17        disposeBoundsTree,
18        acceleratedRaycast
19      );
20      loader.ifcManager.setWasmPath("../../");
21    }
22  );
23
24  model.name = "ifc";
25
26  return <primitive object={model} />;
27};
28
29export default Model;
Experience.tsx で読み込めば OK です。
1import { OrbitControls } from "@react-three/drei";
2import Model from "./Model";
3
4const Experience = () => {
5  return (
6    <>
7      <Model />
8      <ambientLight intensity={0.8} />
9      <OrbitControls makeDefault />
10    </>
11  );
12};
13
14export default Experience;

これでモデルのロードは完了です。
ロード状態をグローバル State で管理する
にオブジェクトの ID を取得するチュートリアルがあったのでやってみたいのですが、それをやる前にロード状態をグローバル State で管理しておきます。
グローバル State の管理には、Redux / Recoil あるいは useContext を使う、 などあるかと思いますが今回は zustand を使用します。
1npm install zustand --force
src 直下に stores ディレクトリを作成し、その中に useLoadingState.tsx を作成します。
1import { IFCLoader } from "web-ifc-three";
2import create from "zustand";
3
4interface LoadedState {
5  loaded: boolean;
6  setLoaded: (flg: boolean) => void;
7  loader: IFCLoader | null;
8  setLoader: (loader: IFCLoader) => void;
9}
10
11export default create <
12  LoadedState >
13  ((set) => ({
14    loaded: false,
15    setLoaded: (flg: boolean) => {
16      set(() => {
17        return { loaded: flg };
18      });
19    },
20    loader: null,
21    setLoader: (loader: IFCLoader) => {
22      set(() => {
23        return { loader: loader };
24      });
25    },
26  }));
loaded を false => true にすることで、ロード完了としています。
また、後々別のとこで IFCLoader を使用するので、IFC Loader もグローバルに管理します。
それではロード完了後 loaded 変数を true に、setLoader で loader を更新していきます。
R3F
より、useLoader の第 4 引数に callback 関数を取ることで、ロードの進捗が取得できますが、今回は ifcManager が用意してくれている setOnProgress を使用します。
Model.tsx を修正していきます。
1import { useLoader } from "@react-three/fiber";
2import { IFCLoader } from "web-ifc-three";
3import { IFCModel } from "web-ifc-three/IFC/components/IFCModel";
4import {
5  acceleratedRaycast,
6  computeBoundsTree,
7  disposeBoundsTree,
8} from "three-mesh-bvh";
9import useLoadingState from "../stores/useLoadingState";
10import { ParserProgress } from "web-ifc-three/IFC/components/IFCParser";
11
12const Model = () => {
13  const { setLoader, setLoaded } = useLoadingState((state) => state);
14
15  const model: IFCModel = useLoader(
16    IFCLoader,
17    "/sample-model.ifc",
18    (loader) => {
19      loader.ifcManager.setupThreeMeshBVH(
20        computeBoundsTree,
21        disposeBoundsTree,
22        acceleratedRaycast
23      );
24      loader.ifcManager.setWasmPath("../../");
25
26      loader.ifcManager.setOnProgress((event: ParserProgress) => {
27        const ratio = event.loaded / event.total;
28        ratio === 1 && setLoaded(true);
29      });
30
31      setLoader(loader);
32    }
33  );
34
35  model.name = "ifc";
36
37  return <primitive object={model} />;
38};
39
40export default Model;
- これで Loading の状態をグローバルに管理することができました。
オブジェクトの ID 取得
公式ドキュメントのオブジェクト ID の取得を実装してみます。hooks 直下に useIdPicker.tsx を作成します。
1import { useFrame, useThree } from "@react-three/fiber";
2import { IFCModel } from "web-ifc-three/IFC/components/IFCModel";
3
4import { useEffect, useRef, useState } from "react";
5import { Object3D } from "three";
6
7import useLoadingState from "../stores/useLoadingState";
8import useFocusId from "../stores/useFocusId";
9
10const useIdPicker = () => {
11  const { scene, raycaster, gl } = useThree();
12  const canvas = gl.domElement;
13
14  const { loaded, loader } = useLoadingState((state) => state);
15
16  const idRef = useRef<string>("");
17  const [rayObjects, setRayObjects] = useState<Object3D[] | null>(null);
18
19  useEffect(() => {
20    if (loaded) {
21      const model = scene.children.filter((mesh) => {
22        const ifc = mesh.name === "ifc" && mesh;
23        return ifc;
24      });
25      setRayObjects(model);
26      canvas.addEventListener("dblclick", () => {
27        console.log(idRef.current);
28      });
29    }
30  }, [loaded]);
31
32  useFrame(() => {
33    if (rayObjects && rayObjects.length > 0) {
34      raycaster.firstHitOnly = true;
35      const obj = raycaster.intersectObjects(rayObjects);
36      if (obj.length > 0 && loader && loaded) {
37        const ifcObject = obj[0];
38        const index = ifcObject.faceIndex;
39        const ifcModel = ifcObject.object as IFCModel;
40        const geometry = ifcModel.geometry;
41        const ifc = loader.ifcManager;
42        const id: string = index
43          ? ifc.getExpressId(geometry, index).toString()
44          : "";
45        idRef.current = id;
46      } else {
47        idRef.current = "";
48      }
49    }
50  });
51
52  return;
53};
54
55export default useIdPicker;
- まずはグローバルに管理している loader と loadedr をインポートします。
- useThree から scene ,raycaster, gl を取得し、gl から canvas 要素を取得します。
- useRef で取得した id を更新します。
- useState では id を取得する対象のモデル(IFCModel)を管理します。初期値は null でロードが完了したら事前にモデルにつけておいた ifc という名前の Mesh を探し、セットします。
- useEffect 内でロードが完了後、IFCModel を取得し、raycast の対象オブジェクトとしてセットしています。また canvas をダブルクリックしたら、現在取得している id を console で出力するようにしています。
- useFrame 内で raycast で最初にぶつかったオブジェクトを取得し、その ID を取得して useRef の値を更新しています。IFCModel とぶつかっていない場合は、useRef の値を''に更新しています。
Experience.tsx 内で実行してあげます。
1import { OrbitControls } from "@react-three/drei";
2
3import useIdPicker from "../hooks/useIdPicker";
4import Model from "./Model";
5
6const Experience = () => {
7  useIdPicker();
8
9  return (
10    <>
11      <Model />
12      <ambientLight intensity={0.8} />
13      <OrbitControls makeDefault />
14    </>
15  );
16};
17
18export default Experience;
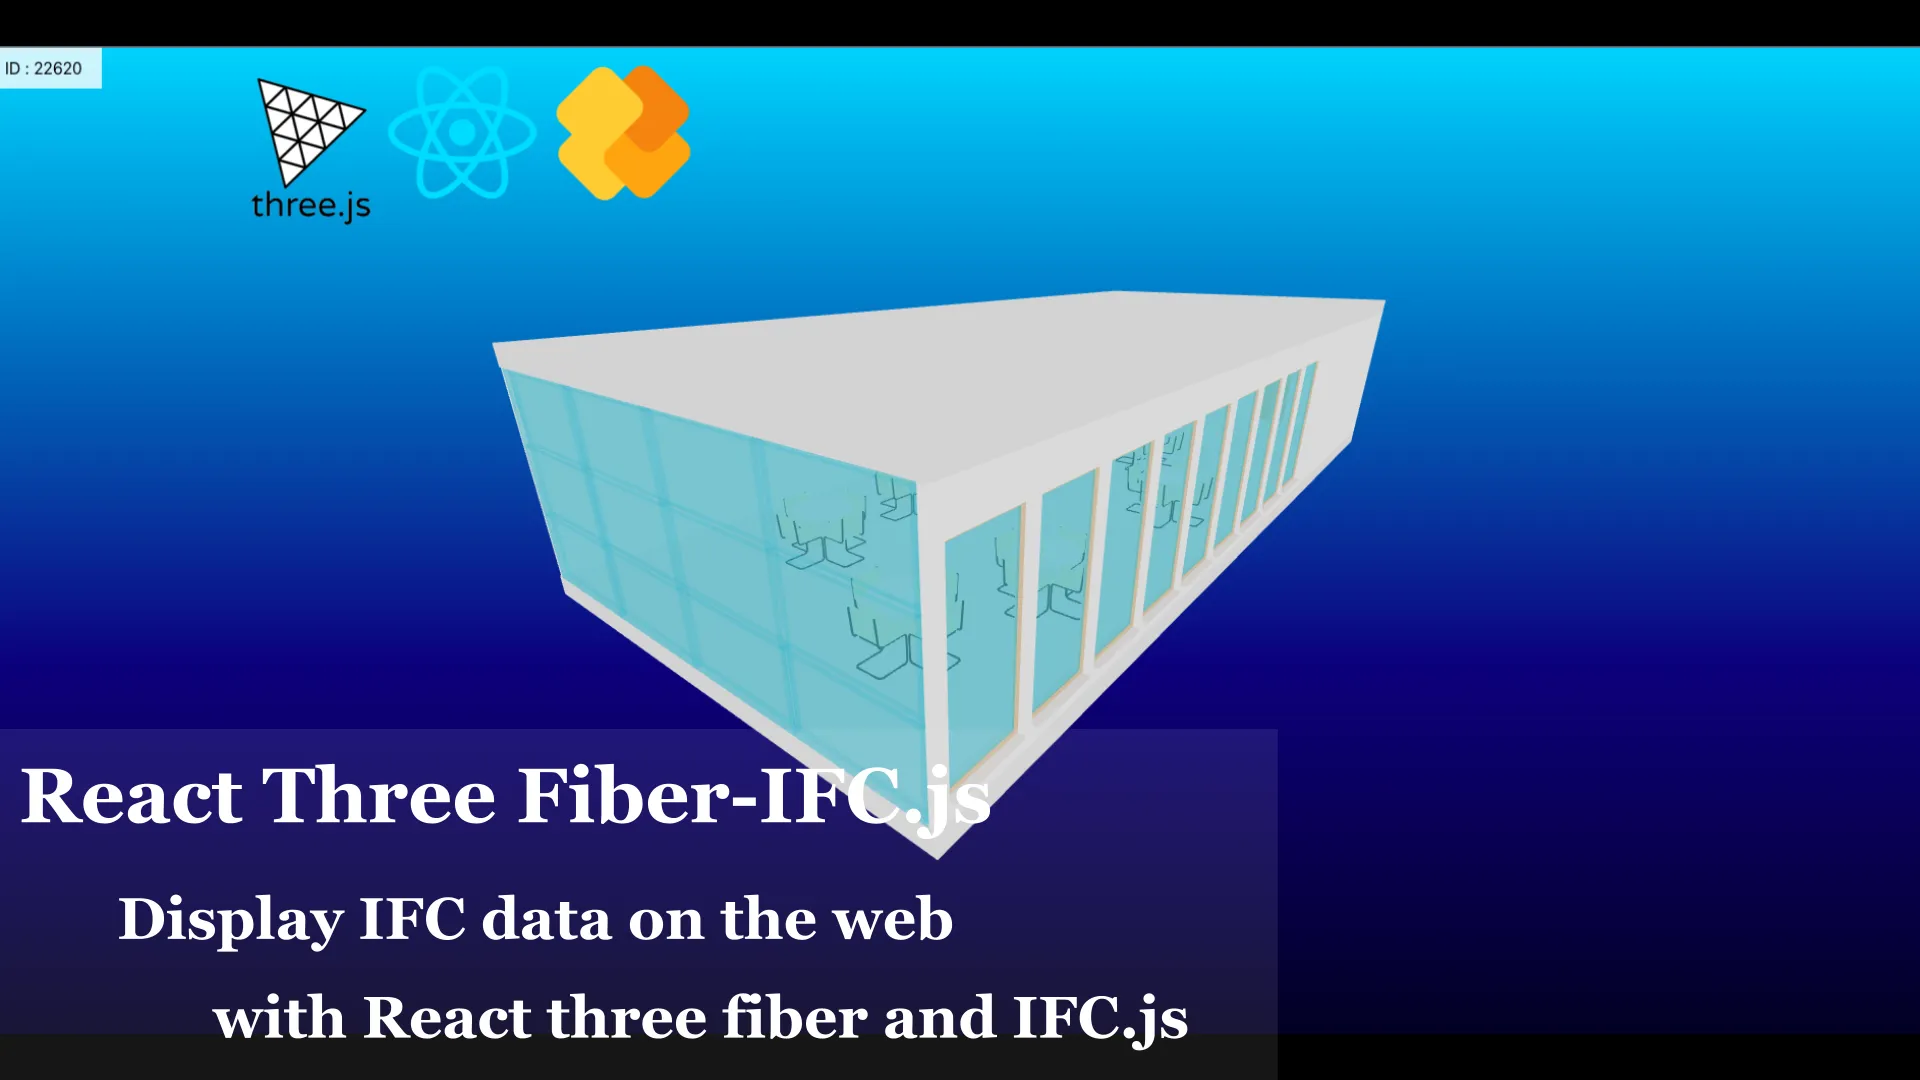
- 以下の画像のように、console で確認すると、ID が取得できてそうです。

取得した ID を画面に表示
画面上に ID を表示していきます。CSS のフレームワーク
を使用していきます。まずはインストールします。
1npm i @chakra-ui/react @emotion/react @emotion/styled framer-motion --force
取得した ID をグローバル State で管理していきます。stores ディレクトリ直下に useFocusId.tsx を作成します。その後、useIdPicker.tsx 内で取得した ID を更新します。
1import create from "zustand";
2
3interface FocusId {
4  focusId: string;
5  setFocusId: (id: string) => void;
6}
7
8export default create <
9  FocusId >
10  ((set) => ({
11    focusId: "",
12    setFocusId: (id: string) => {
13      set(() => {
14        return { focusId: id };
15      });
16    },
17  }));
1import { useFrame, useThree } from "@react-three/fiber";
2import { IFCModel } from "web-ifc-three/IFC/components/IFCModel";
3
4import { useEffect, useRef, useState } from "react";
5import { Object3D } from "three";
6
7import useLoadingState from "../stores/useLoadingState";
8import useFocusId from "../stores/useFocusId";
9
10const useIdPicker = () => {
11  const { scene, raycaster, gl } = useThree();
12  const canvas = gl.domElement;
13
14  const { loaded, loader } = useLoadingState((state) => state);
15  const { setFocusId } = useFocusId((state) => state);
16
17  const idRef = useRef<string>("");
18  const [rayObjects, setRayObjects] = useState<Object3D[] | null>(null);
19
20  useEffect(() => {
21    if (loaded) {
22      const model = scene.children.filter((mesh) => {
23        const ifc = mesh.name === "ifc" && mesh;
24        return ifc;
25      });
26      setRayObjects(model);
27      canvas.addEventListener("dblclick", () => {
28        setFocusId(idRef.current);
29      });
30    }
31  }, [loaded]);
32
33  useFrame(() => {
34    if (rayObjects && rayObjects.length > 0) {
35      raycaster.firstHitOnly = true;
36      const obj = raycaster.intersectObjects(rayObjects);
37      if (obj.length > 0 && loader && loaded) {
38        const ifcObject = obj[0];
39        const index = ifcObject.faceIndex;
40        const ifcModel = ifcObject.object as IFCModel;
41        const geometry = ifcModel.geometry;
42        const ifc = loader.ifcManager;
43        const id: string = index
44          ? ifc.getExpressId(geometry, index).toString()
45          : "";
46        idRef.current = id;
47      } else {
48        idRef.current = "";
49      }
50    }
51  });
52
53  return;
54};
55
56export default useIdPicker;
components ディレクトリに Interface.tsx を作成します。その後 App.tsx で Interface.tsx をインポートします。
ID が空文字でない時、画面左上に ID が表示されれば OK です。
1import { Box } from "@chakra-ui/react";
2
3import useFocusId from "../stores/useFocusId";
4
5const Interface = () => {
6  const { focusId } = useFocusId((state) => state);
7
8  return (
9    <>{focusId !== "" && <Box sx={idDisplayStyle}>{`ID : ${focusId}`}</Box>}</>
10  );
11};
12
13export default Interface;
14
15const idDisplayStyle = {
16  width: "90px",
17  height: "40px",
18  display: "flex",
19  top: "0",
20  left: "0",
21  marginLeft: "5px",
22  lineHeight: "40px",
23  padding: "0 5px 0 5px",
24  background: "rgba(255, 255, 255, 0.8)",
25  textAlign: "center",
26  position: "absolute",
27};
1import { Canvas } from "@react-three/fiber";
2
3import "./App.css";
4import Experience from "./components/Experience";
5import Interface from "./components/Interface";
6
7function App() {
8  return (
9    <>
10      <Canvas
11        style={{
12          width: "100vw",
13          height: "100vh",
14          background: "#f0f8ff",
15        }}
16        camera={{
17          fov: 75,
18          near: 0.1,
19          far: 200,
20          position: [10, 4, 10],
21        }}
22      >
23        <Experience />
24      </Canvas>
25      <Interface />
26    </>
27  );
28}
29
30export default App;

ロード画面を作成

最後に上の GIF 画像のようなロード画面を作っていきます。fadeout する処理にライブラリ gsap を使用するので、インストールします。
1npm install gsap --force
とりあえず Interface.tsx に Loading バーを書いていきます。
1import { Box } from "@chakra-ui/react";
2
3import useFocusId from "../stores/useFocusId";
4
5const Interface = () => {
6  const { focusId } = useFocusId((state) => state);
7
8  return (
9    <>
10      {focusId !== "" && <Box sx={idDisplayStyle}>{`ID : ${focusId}`}</Box>}
11      <Box id="barContainer" sx={barContainerStyle}>
12        <Box id="loadingBar" sx={loadingBarStyle} />
13        <Box id="loadingText" sx={loadingTextStyle}>
14          Loading...
15        </Box>
16      </Box>
17    </>
18  );
19};
20
21export default Interface;
22
23const idDisplayStyle = {
24  width: "90px",
25  height: "40px",
26  display: "flex",
27  top: "0",
28  left: "0",
29  marginLeft: "5px",
30  lineHeight: "40px",
31  padding: "0 5px 0 5px",
32  background: "rgba(255, 255, 255, 0.8)",
33  textAlign: "center",
34  position: "absolute",
35};
36
37const barContainerStyle = {
38  height: "100vh",
39  width: "100vw",
40  top: "0",
41  alignItems: "center",
42  position: "absolute",
43};
44
45const loadingBarStyle = {
46  top: "50%",
47  width: "100vw",
48  height: "2px",
49  position: "absolute",
50  background: "black",
51  transform: "scaleX(1)",
52  transformOrigin: "top center",
53  transition: "transform 1.0s",
54};
55
56const loadingTextStyle = {
57  width: "100%",
58  fontSize: "20px",
59  textAlign: "center",
60  position: "absolute",
61  top: "45%",
62};

ロードの進捗によって、このバーと Loading のテキストを変更していきます。
まずは、Loading 中にカメラの前に配置する白い Plane Mesh を生成していきたいのですが、その前に PlaneMesh の State を管理するために stores ディレクトリに useOverrayState.tsx を作成します。
1import create from "zustand";
2
3interface OverrayState {
4  removeOverray: boolean;
5  setRemoveOverray: (flg: boolean) => void;
6}
7
8export default create <
9  OverrayState >
10  ((set) => ({
11    removeOverray: false,
12    setRemoveOverray: (flg: boolean) => {
13      set(() => {
14        return { removeOverray: flg };
15      });
16    },
17  }));
次に planeMesh を作成していきます。components ディレクトリに LoadingOverRay.tsx を作成し、Experience.tsx で読み込みます。
planeMesh は Shader を使用して fadeout させていきます。また、removeOverray が true になったら scene から削除するようにしています。
1import * as THREE from "three";
2import useOverrayState from "../stores/useOverrayState";
3
4const overlayGeometry = new THREE.PlaneGeometry(300, 300, 1, 1);
5const overlayMaterial = new THREE.ShaderMaterial({
6  transparent: true,
7  uniforms: {
8    uAlpha: { value: 1.0 },
9    uColor1: { value: new THREE.Color("#f0f8ff") },
10    uColor2: { value: new THREE.Color("#ffffff") },
11  },
12  vertexShader: `
13        varying vec2 vUv;
14        void main()
15        {
16          vec4 modelPosition = modelMatrix * vec4(position, 1.0);
17          vec4 viewPosition = viewMatrix * modelPosition;
18          vec4 projectedPosition = projectionMatrix * viewPosition;
19          gl_Position = projectedPosition;
20          vUv = uv;
21        }
22    `,
23  fragmentShader: `
24        varying vec2 vUv;
25        uniform float uAlpha;
26        uniform vec3 uColor1;
27        uniform vec3 uColor2;
28        void main()
29        {
30            float strength = distance(vUv, vec2(0.5));
31            vec3 color = mix(uColor1, uColor2, strength + 0.2 );
32            gl_FragColor = vec4(color, uAlpha);
33        }
34    `,
35});
36
37const LoadingOverRay = () => {
38  const { removeOverray } = useOverrayState((state) => state);
39
40  return !removeOverray ? (
41    <mesh
42      geometry={overlayGeometry}
43      material={overlayMaterial}
44      position={[0, 0, 14]}
45      rotation-y={Math.PI * 0.25}
46      name="overray"
47      dispose={null}
48    />
49  ) : null;
50};
51
52export default LoadingOverRay;
1import { OrbitControls } from "@react-three/drei";
2
3import useIdPicker from "../hooks/useIdPicker";
4import LoadingOverRay from "./LoadingOverRay";
5import Model from "./Model";
6
7const Experience = () => {
8  useIdPicker();
9
10  return (
11    <>
12      <LoadingOverRay />
13      <Model />
14      <ambientLight intensity={0.8} />
15      <OrbitControls makeDefault />
16    </>
17  );
18};
19
20export default Experience;
次に Interface.tsx の loadingBarStyle の transform: "scaleX(1)"を 0 にしときます。
1.....省略
2const loadingBarStyle = {
3  top: "50%",
4  width: "100vw",
5  height: "2px",
6  position: "absolute",
7  background: "black",
8  transform: "scaleX(0)",
9  transformOrigin: "top center",
10  transition: "transform 1.0s",
11};
12.....省略
最後に Model.tsx にローディング中の処理を追記します。(※すみません、ここコードかなり汚いです。hooks に切り出そうとしたのですが、ifcManager の setonprogress の扱いが難しく、試行錯誤してこんな感じになっちゃいました......)
1import { useLoader, useThree } from "@react-three/fiber";
2import { IFCLoader } from "web-ifc-three";
3import { IFCModel } from "web-ifc-three/IFC/components/IFCModel";
4import {
5  acceleratedRaycast,
6  computeBoundsTree,
7  disposeBoundsTree,
8} from "three-mesh-bvh";
9import useLoadingState from "../stores/useLoadingState";
10import { ParserProgress } from "web-ifc-three/IFC/components/IFCParser";
11import useOverrayState from "../stores/useOverrayState";
12import { gsap } from "gsap";
13
14const Model = () => {
15  const { gl, scene } = useThree();
16  const canvas = gl.domElement;
17  const loadingBar = document.getElementById("loadingBar");
18  const loadingText = document.getElementById("loadingText");
19  const barContainer = document.getElementById("barContainer");
20
21  const { setLoader, setLoaded } = useLoadingState((state) => state);
22  const { setRemoveOverray } = useOverrayState((state) => state);
23
24  const handleLoading = () => {
25    setLoaded(true);
26    if (loadingText && barContainer) {
27      loadingText.innerHTML = "Go to Model !!";
28      loadingText.style.cursor = "pointer";
29      loadingText.addEventListener("click", () => {
30        barContainer.style.display = "none";
31        canvas.style.background =
32          "linear-gradient(0deg, rgba(2,0,36,1) 0%, rgba(9,9,121,1) 35%, rgba(0,212,255,1) 100%)";
33        const overrayMesh = scene.children.filter((mesh) => {
34          if (mesh.name === "overray") {
35            return mesh as THREE.Mesh;
36          }
37        });
38        const mesh = overrayMesh[0] as unknown as THREE.Mesh;
39        const material = mesh.material as unknown as THREE.ShaderMaterial;
40        gsap.to(material.uniforms.uAlpha, { duration: 1, value: 0 });
41        setTimeout(() => {
42          setRemoveOverray(true);
43        }, 500);
44      });
45    }
46  };
47
48  const model: IFCModel = useLoader(
49    IFCLoader,
50    "/sample-model.ifc",
51    (loader) => {
52      loader.ifcManager.setupThreeMeshBVH(
53        computeBoundsTree,
54        disposeBoundsTree,
55        acceleratedRaycast
56      );
57      loader.ifcManager.setWasmPath("../../");
58
59      loader.ifcManager.setOnProgress((event: ParserProgress) => {
60        const ratio = event.loaded / event.total;
61        loadingBar!.style.transform = `scaleX(${ratio})`;
62        ratio === 1 && handleLoading();
63      });
64
65      setLoader(loader);
66    }
67  );
68
69  model.name = "ifc";
70
71  return <primitive object={model} />;
72};
73
74export default Model;
75
- setOnProgress でローディングの進捗が取得できます。ratio が<1 未満だとロード中、1 になったらロード完了です。
- ratio < 1 の時は、loadingBar を ratio で x 方向に scale させることで、ロードの進捗に伴ってバーが伸びていくようにしています。
- ratio === 1 になったら、handleLoading 関数を実行します。
- handleLoading 関数では、setLoaded でロード状態の State を更新。
- Loading のスタイルを変更し、テキストをクリックしたら、テキストやバーを display:none にして、Plane Mesh を fadeout させてます。その 0.5s 後に planeMesh を削除しています。
完成
以上になります。普段から IFC データや IFC.js を触っているわけではないので、変な記述などあったら教えていただけると嬉しいです。 ライブラリのインポートを --force で強制的にインポートしているのがちょっと・・・って感じですが、この辺はしっかりバージョン合わせていく必要はあるかなと思います。
ソースコードは
にあげてますのでご興味あれば。
[ 参考 ]
- IFC.js Docs : https://ifcjs.github.io/info/ja/docs/Introduction
- Svelte × Typescript × IFC.js で IFC を Web 上に表示 : https://zenn.dev/masamiki/articles/c9a34119acfd6c
- pmndrs Docs : https://docs.pmnd.rs/
以上